Friday, December 11, 2009

PHP – Automated Creation of Thumbnails

[PHP CODE]

// define the base image dir
$base_img_dir = "./";

// $QUERY_STRING =
// f(3c9b5fa6bc0fa) img_file
// w(123|15%) width of output
// h(123|10%) height of output
// x(123) max width of output
// y(123) max height of output
// t(jpg|png) type of output
// q(100) quality of jpeg

// find tags
preg_match_all("/\+*(([a-z])\(([^\)]+)\))\+*/", $QUERY_STRING,
$matches, PREG_SET_ORDER);

// empty array and set regular expressions for the check
$tags = array();
$check = array( "f" => "[0-9a-zA-Z]{13}",
"w" => "[0-9]+%?",
"h" => "[0-9]+%?",
"x" => "[0-9]+",
"y" => "[0-9]+",
"t" => "jpg|png",
"q" => "1?[0-9]{1,2}" );

// check tags and save correct values in array
for ($i=0; $iif (isset($check[$matches[$i][2]])) {
if (preg_match('/^('.$check[$matches[$i][2]].')$/',
$matches[$i][3])) {
$tags[$matches[$i][2]] = $matches[$i][3];
}
}
}

function notfound() {
header("HTTP/1.0 404 Not Found");
exit;
}

// check that filename is given
if (!isset($tags["f"])) {
notfound();
}

// check if file exists
if (!file_exists($base_img_dir.$tags["f"])) {
notfound();
}

// retrieve file info
$imginfo = getimagesize($base_img_dir.$tags["f"]);

// load image
switch ($imginfo[2]) {
case 2: // jpg
$img_in = imagecreatefromjpeg($base_img_dir.$tags["f"]) or notfound();
if (!isset($tags["t"])) {
$tags["t"] = "jpg";
}
break;
case 3: // png
$img_in = imagecreatefrompng($base_img_dir.$tags["f"]) or notfound();
if (!isset($tags["t"])) {
$tags["t"] = "png";
}
break;
default:
notfound();
}

// check for maximum width and height
if (isset($tags["x"])) {
if ($tags["x"] < imagesx($img_in)) {
$tags["w"] = $tags["x"];
}
}
if (isset($tags["y"])) {
if ($tags["y"] < imagesy($img_in)) {
$tags["h"] = $tags["y"];
}
}

// check for need to resize
if (isset($tags["h"]) or isset($tags["w"])) {
// convert relative to absolute
if (isset($tags["w"])) {
if (strstr($tags["w"], "%")) {
$tags["w"] = (intval(substr($tags["w"], 0, -1)) / 100) *
$imginfo[0];
}
}
if (isset($tags["h"])) {
if (strstr($tags["h"], "%")) {
$tags["h"] = (intval(substr($tags["h"], 0, -1)) / 100) *
$imginfo[1];
}
}

// resize
if (isset($tags["w"]) and isset($tags["h"])) {
$out_w = $tags["w"];
$out_h = $tags["h"];
} elseif (isset($tags["w"]) and !isset($tags["h"])) {
$out_w = $tags["w"];
$out_h = $imginfo[1] * ($tags["w"] / $imginfo[0]);
} elseif (!isset($tags["w"]) and isset($tags["h"])) {
$out_w = $imginfo[0] * ($tags["h"] / $imginfo[1]);
$out_h = $tags["h"];
} else {
$out_w = $tags["w"];
$out_h = $tags["h"];
}

// new image in $img_out
$img_out = imagecreate($out_w, $out_h);
imagecopyresized($img_out, $img_in, 0, 0, 0, 0, imagesx($img_out),
imagesy($img_out), imagesx($img_in), imagesy($img_in));
} else {
// no resize needed
$img_out = $img_in;
}

// check for a given jpeg-quality, otherwise set to default
if (!isset($tags["q"])) {
$tags["q"] = 75;
}

// returning the image
switch ($tags["t"]) {
case "jpg":
header("Content-type: image/jpeg");
imagejpeg($img_out, "", $tags["q"]);
exit;
case "png":
header("Content-type: image/png");
imagepng($img_out);
exit;
default:
notfound();
}

[PHP CODE]

cant get the dam thing to show properly, grab the source here: Elgene

Monday, November 23, 2009

How to Convert a date from SQL to RFC822 Format

This was quite an annoying issue when trying to manually create a RSS feed from SQL / ASP.

Finally worked out the Statement needed (if your DateTime row name is datetime):


or full example statement:


So just chuck that in your SQL statement, and your good to go.

It will format the date as follows:
Wed, 02 Oct 2009 08:00:00 GMT

Also another handy link i found was here, validates your feed. Very helpful:
feedvalidator.org

Monday, November 9, 2009

This is how you get rid of the rick rolled iphone background, applied by the ikee virus

This one worked for me! Had to also download iphone explorer, so that i didnt have to spend about 30minutes typing into the mobile terminal app, but that one works as well.

Today a friend of mine and my girlfriend's jailbroken iphones were hit with an SSH virus, first the background changes and the phone freezes, upon restart the background is a picture of Rick Astley with the words "ikee is never going to give you up" at the top of the screen, trying to change your background will revert back to this background. I had SSH turned off on my own iPhone and it hasn't hit me.

If you have the "ikee is never going to give you up" virus here is how to get rid of it.

Step 1, change your SSH password, make sure you change the mobile password and root password and don't forget the password lol, do this even if it hasn't happened to you yet as it will stop it ever happening to you.
http://www.redmondpie.com/how-to-secure-yo...h-hack-9140084/

Step 2, to remove the ikee wallpaper you will need to SSH into your phone and delete \var\mobile\Library\LockBackgroung.jpg then reboot. You can probably do this through mobileterminal from step 1 if you know how to use unix, but I don't.

ps. Apparently this has also happened to people who haven't jailbroken, the only way to get rid of it would be to jailbreak and do the above steps, or wipe it back to factory and restore.


via: nonoobs

Sunday, November 8, 2009

Quick Fix for iPhone "ikee is never going to give you up" SSH the ikee virus


Step 1. Change the default mobile and root password for your iphone SSH to become immune to this virus once for all ! The tutorial for this is here: http://www.redmondpie.com/how-to-secure-your-jailbroken-iphone-from-ssh-hack-9140084/

Step 2. Download mobileterminal through Cydia or use Iphone Explorer (www.iphone-explorer.com) for Windows

Step 3. Logon as Root and delete below files:
(1). /var/mobile/Library/LockBackground.jpg
(2). /System/Library/LaunchDaemons/com.ikey.bbot.plist
(3). /bin/poc-bbot
(4). /bin/sshpass
(5). /var/log/youcanbeclosertogod.jpg

Step 4. Set up your favourite wallpaper and reboot your device.

P.S. For those who use mobileterminal to delete files and not familiar with linux command,

a. the command for deleting files is "rm". Example, rm /var/mobile/Library/LockBackground.jpg

b. the linux path is case-sensitive, so make sure you type the path correctly.

Why aren't songs with the same album art grouped together, Was having a problem with syncing music from itunes.

Found this one useful in google cache.
  • Last Modified: August 05, 2008
  • Article: TS1468
  • Old Article: 304389

Symptoms

When viewing the iTunes Library or a playlist, songs from the same album may not be grouped together as expected in Album view when sorted by album.

Album View

Products Affected

iTunes, iTunes 7 or later

Resolution

Solution

There are three reasons why songs from the same album may not be grouped together

  • The album names of the songs may differ slightly
  • The songs from the same album may have different artists
  • Not all songs in the album have the same "Album Artist" assigned to it

Album Names

In the example below the two songs appear to have the same album name, however, if you look closely the first song includes an additional space between the words "Ray" and "of" that the second song does not have.

Slight variations in spacing, spelling, or punctuation of the album name can cause iTunes to consider the two songs to be from separate albums. Be sure that all the songs that are supposed to be from the same album have the exact same album name. One way to easily do this is to select all the songs and choose Get Info from the File menu and retype the album name such that it will apply to all the selected songs.


Albums with various artists

Some albums include songs from multiple artists. Because of this iTunes may display them as separate album as shown below:

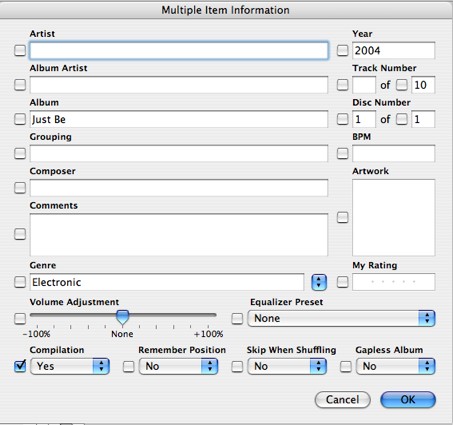
You can mark these songs as a compilation in iTunes. Do do this, select all the songs that you want to be included in the compilation and select Get Info from the file menu and select Yes in the Compilation menu as shown below. After clicking OK iTunes group all the selected songs together.


Albums in which all songs don't have the same Album Artist information

iTunes 7 includes a new attribute for song files called Album Artist This allows you to assign a primary artist name for an album that many includes songs by several artists. It is important that all songs in the album have the same Album Artist name. To assign an Album Artist, select all the songs in the album and choose Get Info from the File menu. Next, type a name in the Album Artist field name such that it will apply to all the selected songs. This field can optionally be left blank if all the songs have the same album name. The Album Artist field is shown in the picture above

Additional Information

The solutions above also apply to situations where multiple album covers for the same album are seen in cover flow as shown below

Cover Flow View

Dont get Rick Rolled on you iPhone, Change the Password

If you’re one of the many who are jailbreaking your iPhone to get options such as tethering, make sure you change the root access password once you do.
In addition to your possibly getting Rick-Rolled

Your jailbroken phone could possibly be held for ransom

If you’ve never changed the default device password, now’s the time. Here’s how:

The app to use on the iPhone is called MobileTerminal and it’s available for free in the Cydia store.

Once you have MobileTerminal installed, launch it and you should see a prompt saying this or similar:

iPhoneName: ~ Mobile$

  • At that prompt, type: passwd
  • You’ll be prompted for the ‘old’ (current) password for the mobile user. Enter this as the old password: alpine
  • You’ll then be prompted to enter the new password – so just type in your desired new password. Use good password principles if possible (long and stong). You will not see characters appearing on the screen as you type – that’s normal, not a concern.
  • You’ll then be prompted to re-enter the new password. Do that.
  • You should then be returned to the Mobile$ prompt that you started on when opening the MobileTerminal app. There’s no success message to say the password was changed – but if you’re returned to the prompt and do not get an error, the change was successful. And you’re done with change for the mobile account.
  • The second primary admin account for the iPhone is called root – so now you need to change that as well.
  • Type this to switch to the root user: login root
  • You’ll be prompted for the root user’s current password. Enter this: alpine
  • Type this to start the password change routine again: passwd
  • Enter the old password for root (it is ‘alpine’, same as for the mobile user) and enter your desired new password twice, just as you did for the mobile account
via whatsmypass

Tuesday, September 15, 2009

PHP counting the # of word occurance in a string


$string = 'hi there [hello]this is my hello message[/hello][hello]this is another hello message[/hello]';

// Count the number of occurences:
$count = preg_match_all( '/\\[hello\\]/', $string, $dummy );

// Delete [hello] if not closed
// First replace closed matches, then delete remaining, then replace back

$string = preg_replace( '/\\[hello\\](.*)\\[\\/hello\\]/U', '[qwerty]$1[/qwerty]', $string );

$string = str_replace( '[hello]', '', $string );
$string = str_replace( 'qwerty', 'hello', $string );

echo "Count is: $count

$string";
?>

How to disable/turn off Visual Studio .NET JIT Debugger

How to disable/turn off Visual Studio .NET JIT Debugger

* How to disable/turn off Visual Studio .NET JIT Debugger
Option 1: Registry key from Enabling JIT Debugging

For an application that includes managed code, the common language runtime will present a similar dialog to JIT-attach a debugger. The registry key that controls this option is called HKEY_LOCAL_MACHINE\Software\Microsoft\.NETFramework\DbgJITDebugLaunchSetting.

If value = 0, prompt the user by means of a message box. The choices are:
Continue. This results in a stack dump and process termination.
Attach a debugger. In this case, the runtime spawns the debugger listed in the DbgManagedDebugger registry key. If none, control is returned, and the process is terminated.
If value = 1, simply return control. This results in a stack dump, after which the process is terminated. (No more dialog)
If value = 2, spawn the debugger listed in the DbgManagedDebugger registry key.
Option 2: If you want to disable the JIT debug dialog, but still want an error dialog:

Visual Studio.NET|Tools|Options|Debugging|Just-In-Time and deselect "Common Language Runtime" and now you’ll get an OK/Cancel dialog instead of the select a Debugger Dialog. Note: The registry entry from Option 1 above will need to be 0 for the dialog to show up.

*Disabling Visual Studio "Just In time Debugger"

Go to Tools -> Options -> Debugging -> Just-In-Time and disable VS as the JIT debugger.

Wednesday, September 2, 2009

parsing the google trends atom feed rss


$feed = simplexml_load_file('http://www.google.com/trends/hottrends/atom/hourly');
$children = $feed->children('http://www.w3.org/2005/Atom');
$parts = $children->entry;
foreach ($parts as $entry) {
$details = $entry->children('http://www.w3.org/2005/Atom');
$dom = new domDocument();
@$dom->loadHTML($details->content);
$anchors = $dom->getElementsByTagName('a');
foreach ($anchors as $anchor) {
$url = $anchor->getAttribute('href');
$urltext = $anchor->nodeValue;
echo 'Link: ' . $urltext . ' ';
}
}

Thursday, July 2, 2009

Showing Page Load Time: Asp Classic/VBScript


Page Load Time: Asp Classic/VBScript


Shows the script page load time at the bottom of each ASP page.


At the header of the Page:

<%

dim starttime

startrime = Timer

%>


At the footer of the page:

<%

dim endtime,timetaken

endtime = Timer

timetaken = FormatNumber(endtime - starttime,4)

response.write "page load time: " & timetaken & " seconds"

%>

Sunday, May 10, 2009

Javascript Saving user name and password to a cookie


<html>
<head>
<script language="JavaScript"><!--
function Get_Cookie(name) {
var start = document.cookie.indexOf(name+"=");
var len = start+name.length+1;
if ((!start) && (name != document.cookie.substring(0,name.length))) return null;
if (start == -1) return null;
var end = document.cookie.indexOf(";",len);
if (end == -1) end = document.cookie.length;
return unescape(document.cookie.substring(len,end));
}a
function Set_Cookie(name,value,expires,path,domain,secure) {
document.cookie = name + "=" +escape(value) +
( (expires) ? ";expires=" + expires.toGMTString() : "") +
( (path) ? ";path=" + path : "") +
( (domain) ? ";domain=" + domain : "") +
( (secure) ? ";secure" : "");
}
var today = new Date();
var expires = new Date(today.getTime() + (56 * 86400000));
function set() {
if (document.logonForm.elements[1].checked)
Set_Cookie("userid",document.logonForm.userid.value,expires);
if (document.logonForm.elements[3].checked)
Set_Cookie("password",document.logonForm.password.value,expires);
}
function get() {
userid = Get_Cookie("userid")
if (userid != null) {
document.logonForm.userid.value = userid;
document.logonForm.elements[1].checked = true;
}
password = Get_Cookie("password")
if (password != null) {
document.logonForm.password.value = password;
document.logonForm.elements[3].checked = true;
}
}
//--></script>
</head>
<body onLoad="get()">
<form name="logonForm" onSubmit="return set();">
<p>Userid: <input type="input" name="userid"> Save <input type="checkbox">
<p>Password: <input type="password" name="password"> Save <input type="checkbox">
<p><input type="reset"> <input type="submit">
</form>
</body>
</html>

Monday, May 4, 2009

Simple Javascript Page Redirect

<script language="javascript">

document.location='YOUR LINK HERE';

</script>

Sunday, April 19, 2009

Javascript Submitting form on pressing the enter key

<html>
<body>
<script language="JavaScript">
function submitonEnter(evt){
var charCode = (evt.which) ? evt.which : event.keyCode
if(charCode == "13"){
document.form1.submit();
}
}
</script>

<form name="form1" action="index.php?mid=72me211v4604" method="POST">
<textarea name="msg" onKeyDown="javascript:return submitonEnter(event);"></textarea>
<br>
<input type="submit" value="Sänd/uppdatera">
</form>
</body>
</html>

Sunday, March 22, 2009

Classic ASP: dump text file contents into array

The code below is reading text file and putting its lines into array.
After the code is executed, each item of the array will be one
line of the text file.


<%

Function ReadTextFile(strFilePath)

 Dim objFSO, objFile, strAllFile

 Set objFSO = Server.CreateObject("Scripting.FileSystemObject")

 Set objFile = objFSO.OpenTextFile(strFilePath)

 strAllFile = ""

 If Not(objFile.AtEndOfStream) Then

  strAllFile = objFile.ReadAll

 End If

 objFile.Close

 Set objFile = Nothing

 Set objFSO = Nothing


 strAllFile = Replace(strAllFile, Chr(13)&Chr(10), Chr(13))

 strAllFile = Replace(strAllFile, Chr(10)&Chr(13), Chr(13))

 ReadTextFile = Split(strAllFile, Chr(13))

End Function


'usage

Const FILE_NAME="myfile.txt"

Dim arrLines, x, curLine

Response.Write("reading file: " & FILE_NAME & "...<br />")

arrLines = ReadTextFile(Server.MapPath(FILE_NAME))

Response.Write("amount of lines: " & (UBound(arrLines)+1) & "<br />")

Response.Write("file contents:<hr />")

For x=0 To UBound(arrLines)

 curLine = arrLines(x)

 Response.Write("Line #" & (x+1) & " " & Server.HTMLEncode(curLine) & "<br />")

Next

Response.Write("<hr />")

%>


Source: http://forums.aspfree.com/

Tuesday, March 10, 2009

Loading an XML file with Javascript.

Should fill the data from the XML file into the span tag on the HTML document.

<script type="text/javascript">
function parseXML()
{
try //Internet Explorer
{
xmlDoc=new ActiveXObject("Microsoft.XMLDOM");
}
catch(e)
{
try //Firefox, Mozilla, Opera, etc.
{
xmlDoc=document.implementation.createDocument("","",null);
}
catch(e)
{
alert(e.message);
return;
}
}
xmlDoc.async=false;
xmlDocVal = "/xmlfile.xml";
xmlDoc.load(xmlDocVal);
document.getElementById("divtarget").innerHTML=
xmlDoc.getElementsByTagName("xmlnodesource")[0]
.childNodes[0].nodeValue;

XML File
<?xml version="1.0" encoding="ISO-8859-1" ?>
<xmlnodesource>Data</xmlnodesource>

HTML
<span id="divtarget"></span>

Basic ASP XML Output

ASP XML Output

<%
response.contentType="text/xml"
response.write("<?xml version='1.0' encoding='ISO-8859-1'?>")
response.write("<note>mooage</note>")
%>

Tuesday, March 3, 2009

Including a file in ASP

I always forget the exact statement for this for some reason, ill probably remember now ;)

<!--#include file="wisdom.inc"-->

http://www.w3schools.com/asp/asp_incfiles.asp

Thursday, February 26, 2009

ASP RSS Retrieval

Grabs a feed and displays it.

'::::::::::::::::::::::::::::::::::::::::::::::::::
':::: rss.asp ::::::::::::::::::::::::::::::::::
'::::::::::::::::::::::::::::::::::::::::::::::::::

<%
Call getRSS(10)
Sub getRSS(howManyResults)
myRSSfile = "http://rss.news.yahoo.com/rss/tech"
Set xmlHttp = Server.CreateObject("MSXML2.XMLHTTP.4.0")
xmlHttp.Open "Get", myRSSfile, false
xmlHttp.Send()
myXML = xmlHttp.ResponseText

Set xmlResponse = Server.CreateObject("MSXML2.DomDocument.4.0")
xmlResponse.async = false
xmlResponse.LoadXml(myXML)
Set xmlHttp = Nothing

Set objLst = xmlResponse.getElementsByTagName("item")
Set xmlResponse = Nothing
intNoOfHeadlines = objLst.length -1
For i = 0 To (intNoOfHeadlines)
Set objHdl = objLst.item(i)
for each child in objHdl.childNodes
Select case lcase(child.nodeName)

case "title"
title = child.text
case "link"
link = child.text
case "description"
description = child.text
'You can also use the following: author,category,comments,enclosure,guid,pubDate,source

End Select

next
kk = kk+1
if kk < howManyresults+1 then
Response.Write "<br /><a href=""" & link & """>" & title & "</a> <br /> " & description & "<br>"
end if
Next

End Sub

%>

'::::::::::::::::::::::::::::::::::::::::::::::::::
'::::::::::::::::::::::::::::::::::::::::::::::::::


Javascript - Selecting a text box on page Load

If you want to have a text input box on your page highlighted on first load, you can use the following java script.

insert into the section of your HTML document:

<script language="javascript" type="text/javascript">
function selectThis() {
var selectval = document.getElementById("textboxid");
selectval.select(); }
</script>

insert into the head tag:
<body onload="selectThis();">

This will select a text box on page load, eg.:
<input type="text" id="textboxid" value="foo">

Also if you would like to have the text highligted as soon as the box is clicked, you can use the tag:
onclick:this.select();

full link:
<input type="text" id="textboxid" value="foo" onclick="this.select();">